TM 5-4220-226-14&P
(4) Install valve stem (7) into the valve body (8). Tighten the stem until it is seated, then back it out
about 1/2 turn.
(5) Thread packing nut (4) onto the valve body and tighten slightly.
(6) Place control knob (3) onto stem (7) and rotate the stem all the way out, then back again. The
control knob should turn smoothly without binding.
(7) Tighten packing nut (4) with a wrench until resistance is felt when turning the knob.
(8) Install spring (2) and locknut (1) onto the stem. Tighten the locknut until tight or until the threaded
end of the valve stem is flush or slightly protrudes.
5-9. One-Way Valve Assembly Maintenance.
This task covers:
a. Disassembly
b. Cleaning and Inspection
c. Repair
d. Reassembly
INITIAL SETUP
Tools
Materials Required (continued)
Tool Kit, General Mechanic's (item 4, appx B)
Silicone Lubricant (item 8, appx E)
Teflon Tape (item 10, appx E)
Materials Required
Soft Bristle Brush (item 1, appx E)
Equipment Conditions
Clean, Lint-Free Cloths (item 2, appx E)
Warm Fresh Water (item 4, appx E)
One-way valve removed from side block (para 4-14).
Nonionic Detergent (NID Solution) (item 3, appx E)
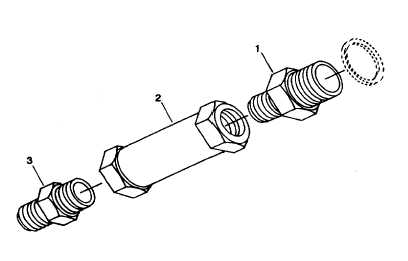
a. Disassembly
(1) Secure valve in soft-jaw vise and remove adapter (1).
(2) Remove adapter (3) from valve (2).
5-5